
Table of Contents
- Understanding the Anatomy of Carbide Saw Blades
- Assessing the Damage: When to Restore vs. Replace
- Checking for Runout
- Essential Tools and Materials for Restoring Old Carbide Saw Blades for Woodworking
- The Cleaning Process: Removing Pitch and Resin
- Mechanical Inspection and Plate Flattening
- Sharpening Techniques for Carbide Teeth
Every woodworker knows the frustration of a saw blade that has lost its edge. You push a piece of cherry or oak through the table saw, and instead of a clean, effortless glide, you encounter resistance, burning, and a jagged edge. Many beginners assume that once a blade stops performing, it is time for the scrap heap. However, learning the art of restoring old carbide saw blades for woodworking can save you hundreds of dollars and provide a deeper understanding of your most critical shop tools.
Carbide-tipped blades are engineered for longevity, but they are not invincible. Over time, wood resins, pitch, and heat-transformed adhesives from plywood build up on the teeth and the plate. This buildup increases friction, which leads to more heat, further dulling the carbide. By following a systematic restoration process, you can bring these high-performance tools back to life, often achieving a level of sharpness that rivals a brand-new factory edge.
This guide will walk you through the entire process, from initial assessment and deep cleaning to mechanical inspection and precision sharpening. Whether you are dealing with a 10-inch table saw blade or a 12-inch miter saw blade, these principles remain the same. Let’s dive into the technical details of how you can reclaim your cutting performance.
Understanding the Anatomy of Carbide Saw Blades
To effectively restore a blade, you must first understand what makes a carbide-tipped tool unique. Unlike high-speed steel (HSS) blades, where the entire body is made of the same material, carbide blades feature a steel plate with small “teeth” of tungsten carbide brazed onto the tips. Tungsten carbide is an incredibly hard ceramic-metal composite that can withstand much higher temperatures than steel.
The steel plate itself is the foundation of the blade. It must be perfectly flat and tensioned to ensure it doesn’t wobble or vibrate during high-speed rotation. Within the plate, you will often see laser-cut expansion slots. These slots allow the metal to expand as it heats up during a cut without warping the entire disk.
The “braze” is the silver solder that holds the carbide tip to the steel shoulder. This is a critical point of inspection. If the braze is compromised, the tooth can fly off during use, creating a significant safety hazard.
The Role of Cobalt Binders
In the manufacturing of carbide, cobalt is typically used as a binder to hold the tungsten particles together. Interestingly, some harsh cleaning chemicals can actually leach cobalt from the carbide, making the teeth brittle. This is why choosing the right restoration chemicals is vital for the long-term health of your woodworking tools.
Different Tooth Grinds
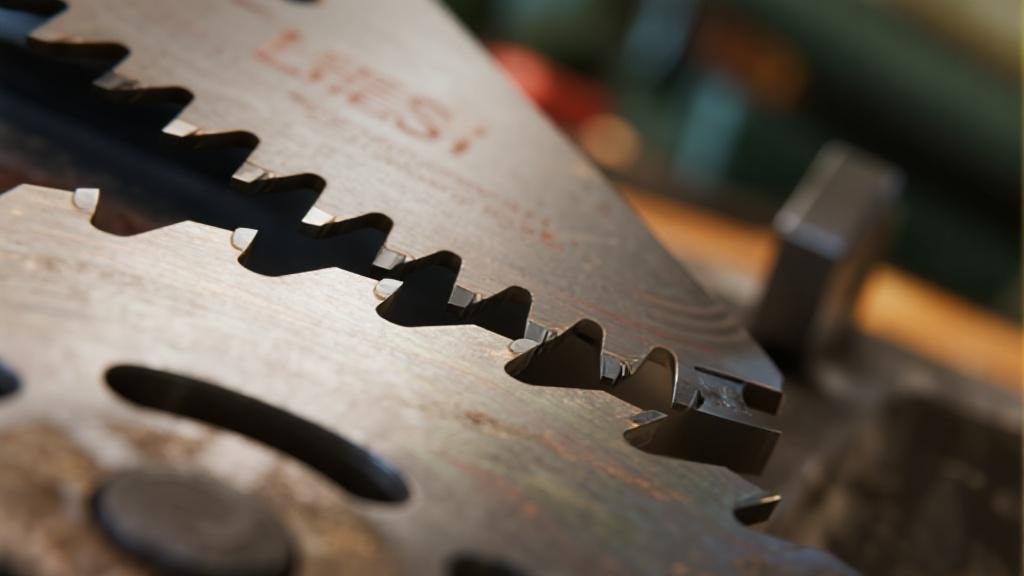
Restoration also requires identifying the tooth grind. Common profiles include:
- Alternate Top Bevel (ATB): Common for crosscutting wood.
- Flat Top Grind (FTG): Primarily used for efficient ripping.
- Triple Chip Grind (TCG): Found on blades meant for laminates or non-ferrous metals.
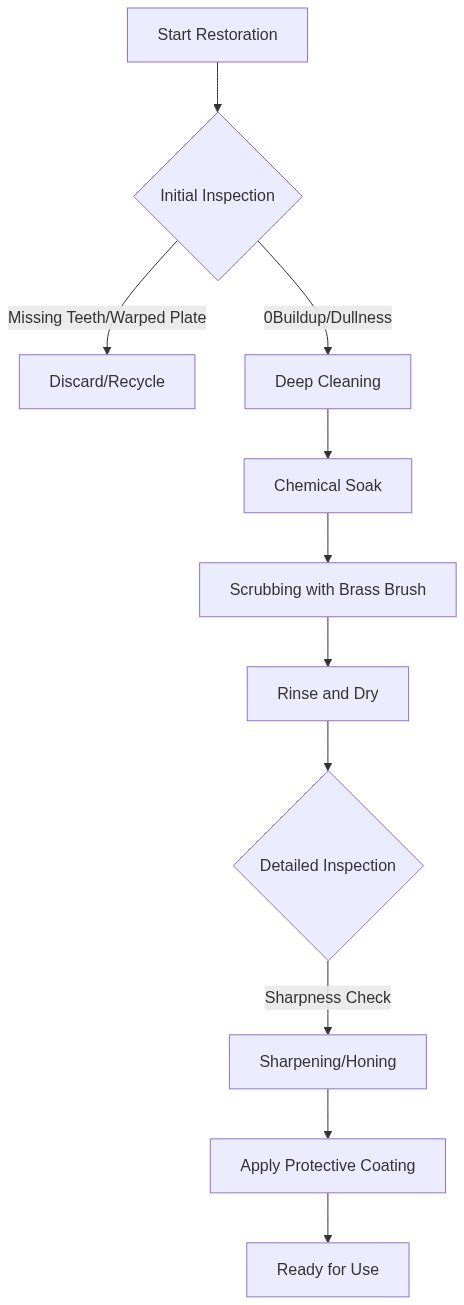
Assessing the Damage: When to Restore vs. Replace
Before you invest time in restoring old carbide saw blades for woodworking, you need to determine if the blade is actually salvageable. Not every old blade is a candidate for restoration. Some have suffered structural failures that make them dangerous to use.
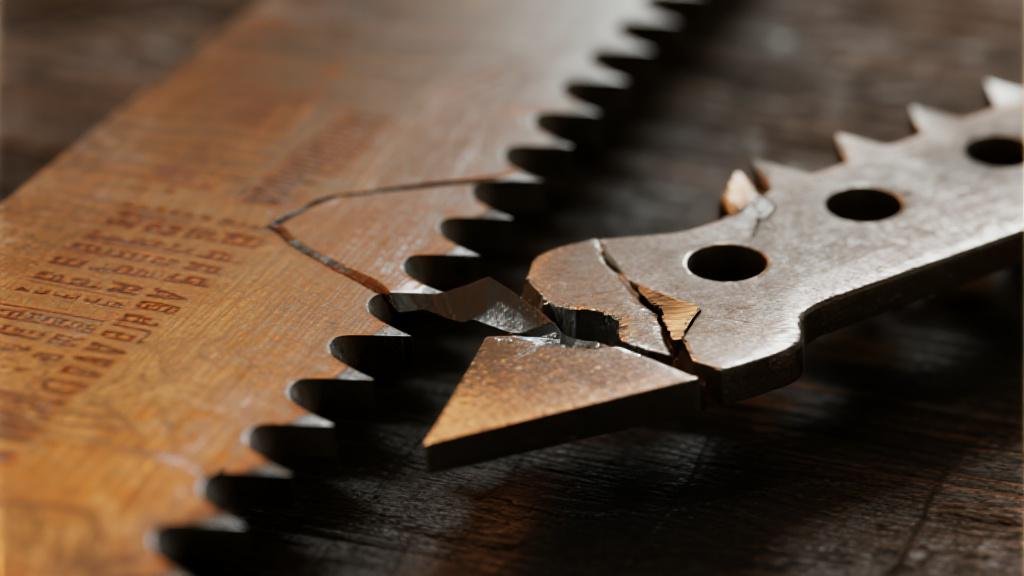
The first thing to check for is missing or chipped teeth. If a blade is missing more than two or three carbide tips, the cost of having a professional braze on new tips might exceed the value of the blade. However, if the teeth are just dull or have minor micro-chipping, they can usually be ground back to a fresh edge.

Checking for Runout
You can check for flatness by placing the blade on a known flat surface, like a cast-iron table saw top. If the blade rocks or if you can see light under the center, it may be warped. For a more precise measurement, use a dial indicator to check for “runout” while the blade is mounted on your saw’s arbor. Anything more than 0.003 to 0.005 inches of runout will result in poor cut quality.
Evaluating the Carbide Thickness
Carbide tips can only be sharpened a certain number of times. Look at the “face” of the carbide tooth. If the carbide is getting very thin—approaching the thickness of a fingernail—it may have reached the end of its life. Most high-quality blades can be sharpened 10 to 15 times before the carbide is spent.
Essential Tools and Materials for Restoring Old Carbide Saw Blades for Woodworking
Having the right kit is essential for a successful restoration. You don’t need expensive machinery, but you do need specific supplies that are designed to interact safely with tungsten carbide and tool steel.
- Cleaning Tub: A shallow container large enough to submerge the blade.
- Cleaning Solution: Specialized pitch and resin removers or concentrated citrus-based degreasers.
- Brass Brush: Softer than carbide and steel; removes resin without scratching the plate.
- Diamond Files: 400-grit for chip removal and 1200-grit for honing.
- Dry Lubricant: Specialized blade wax to prevent rust and reduce future friction.
The Cleaning Process: Removing Pitch and Resin
The most common reason for poor blade performance isn’t actually a dull edge, but rather the accumulation of wood pitch. This layer of “gunk” acts like a brake, increasing friction and making the blade feel dull.
To begin, place the blade in your container and cover it with cleaning solution for 10 to 20 minutes. After the soak, use your brass brush to scrub each tooth and the “gullets”—the curved areas between the teeth. If resin is left in the gullets, it can prevent efficient chip ejection, leading to more heat buildup.
Pro Tip: After scrubbing, rinse the blade with water and dry it immediately with compressed air. Flash rust can form on a steel plate within minutes if left to air dry.
Mechanical Inspection and Plate Flattening
Once the blade is clean, use a magnifying glass to look at the tips of the carbide. You are looking for rounded edges or tiny “pitting.” If the edges look like a used bar of soap rather than a crisp mountain peak, they need sharpening.
Check the plate for “tensioning marks.” High-quality blades are often hammered or rolled at the factory to create internal stresses that keep the blade flat while spinning. Do not try to sand these flat; they are essential for performance.
Sharpening Techniques for Carbide Teeth
Sharpening carbide requires grinding with industrial diamonds. If you are sharpening by hand, focus on the “face” of the tooth. Place your diamond file flat against the face and give it 3 to 5 light, consistent strokes. It is vital to do the exact same number of strokes on every single tooth to keep the blade in balance.

While DIY honing is great for maintenance, a professional sharpening service uses CNC grinding machines that can sharpen the tops, faces, and sides of the teeth to within microns of accuracy. If you have a high-end specialty blade, a professional sharpening is often the best investment.
| Feature | Restore / Clean | Professional Sharpen | Replace Blade |
|---|---|---|---|
| Pitch Buildup | Excellent Results | Included | Not Necessary |
| Dull Edges | Minor Improvement | Factory Sharpness | New Edge |
| Missing Teeth | Not Possible | Possible (Extra Cost) | Recommended |
| Cost | $ (Low) | $$ (Medium) | $$$ (High) |
By following these steps, you can ensure your woodworking projects are defined by clean cuts and safe operation. Restoring your blades isn’t just about saving money—it’s about maintaining the precision that your craftsmanship deserves.