
Learn how to repair broken carbide saw blade teeth with our comprehensive guide. Master the art of brazing, grinding, and maintenance to save your expensive blades and restore factory-level performance.
Table of Contents
- Understanding the Anatomy of a Carbide-Tipped Saw Blade
- Identifying the Root Causes of Tooth Failure
- Initial Inspection: Determining if a Blade is Worth Saving
- Essential Equipment for Carbide Tooth Repair
- The Heating Source and Brazing Materials
- Step-by-Step Instructions for Repair
- The Metallurgy of Brazing: Why Temperature Control Matters
- Precision Grinding: Restoring the Cutting Edge Geometry
- Economic Analysis: When to Repair vs. When to Replace
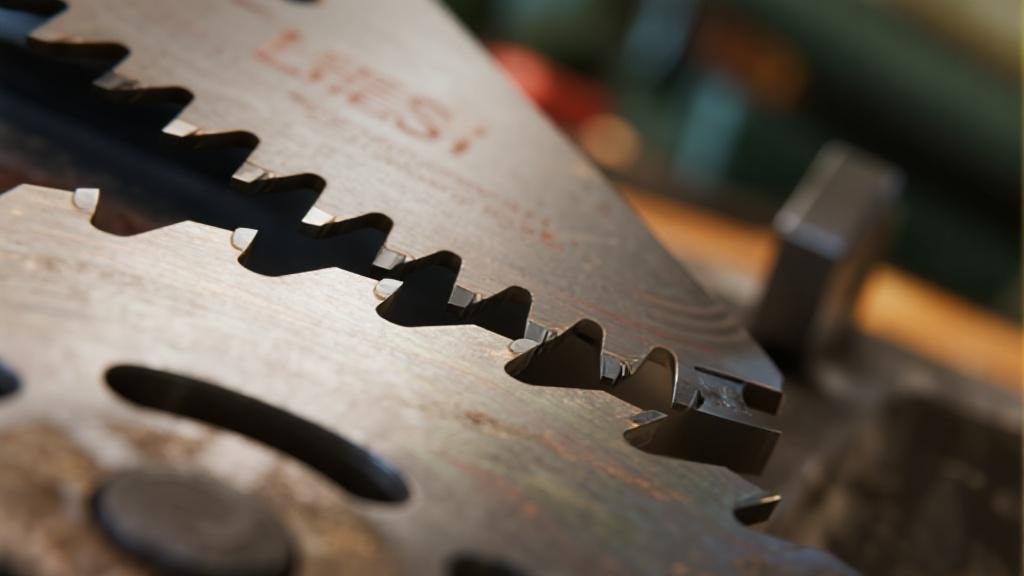
The sudden “ping” of a carbide tip snapping off mid-cut is a sound every woodworker and metalworker dreads. Carbide-tipped saw blades are the workhorses of the modern workshop, prized for their ability to stay sharp up to 50 times longer than standard steel blades. However, their greatest strength—extreme hardness—is also their greatest weakness. Carbide is brittle, and hitting a hidden nail or a particularly hard knot can result in a chipped or missing tooth.
Many professionals and hobbyists assume that once a tooth is gone, the blade is destined for the scrap heap. This is a costly misconception. Learning how to repair broken carbide saw blade teeth can save you hundreds of dollars in replacement costs and extend the life of your high-performance tooling. This guide provides a deep dive into the technical process of “re-tipping,” from the metallurgy of brazing to the precision of final grinding.
Professional Insight: Re-tipping is not just about saving money; it’s about maintaining the specific performance characteristics of a high-end blade that has been perfectly tensioned for your machine.
Understanding the Anatomy of a Carbide-Tipped Saw Blade
To understand how to repair broken carbide saw blade teeth, one must first understand the relationship between the carbide tip and the steel saw plate. A carbide-tipped blade is a composite tool. The body of the blade is typically made of high-quality tool steel, laser-cut or stamped to provide stability and tension. The “teeth” are actually small inserts of tungsten carbide, a compound of tungsten and carbon atoms, often held together by a metallic cobalt binder.
Tungsten carbide is incredibly dense and hard, ranking just below diamond on the Mohs scale. However, it cannot be welded directly to the steel plate because the two materials have vastly different melting points and thermal expansion rates. Instead, they are joined through a process called brazing. Brazing involves using a filler metal (usually a silver-based alloy) that melts at a lower temperature than the base metals.
Identifying the Root Causes of Tooth Failure
Before diving into the repair, it is crucial to diagnose why the tooth failed in the first place. Common causes of tooth failure include:
- Impact Damage: Hitting “tramp metal” (nails, staples, or wire) or rocks embedded in the wood.
- Thermal Shock: If a blade is run too hot and then suddenly cooled, the carbide can develop micro-cracks known as “heat checking.”
- Improper Feed Rate: Pushing material too slowly causes friction heat, while pushing too fast puts excessive mechanical pressure on the brittle tips.
- Vibration and Flutter: If the saw arbor is bent or the blade is poorly tensioned, the resulting vibration can cause the carbide to fatigue.
Initial Inspection: Determining if a Blade is Worth Saving
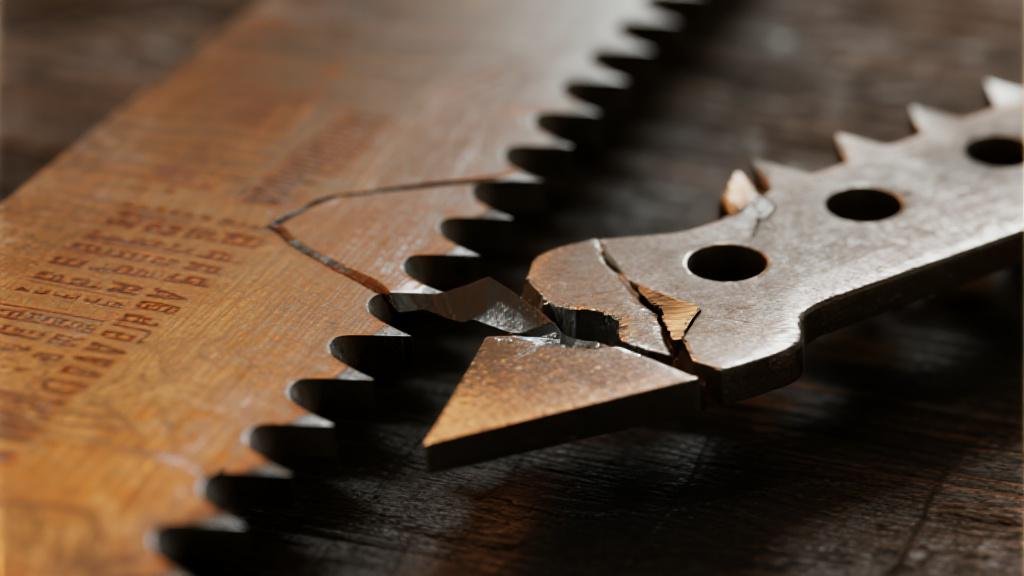
Not every damaged blade should be repaired. Use a high-magnification jeweler’s loupe or a digital microscope to examine the pockets where the teeth were lost. Look for “blueing” of the steel, which indicates extreme overheating that has drawn the temper out of the metal. If the steel around the pocket is soft, it will not hold a new braze effectively.
Furthermore, count the number of missing teeth. As a general rule of thumb, if more than 25% of the teeth are missing or damaged, the labor and material costs of repair may exceed the cost of a new, factory-balanced blade.
Essential Equipment for Carbide Tooth Repair
Repairing carbide teeth is a specialized task that requires tools beyond the standard woodworking kit. To master how to repair broken carbide saw blade teeth, you will need:
- High-Precision Metallurgy Tools: Specialized clamps and ceramic picks.
- Replacement Carbide Tips: Must match the grade (C1-C4) and geometry of your existing teeth.
- Silver Brazing Alloy: Preferably tri-metal shims (silver-copper-silver).
- Diamond Grinding Wheels: Standard wheels will not cut tungsten carbide.
The Heating Source and Brazing Materials
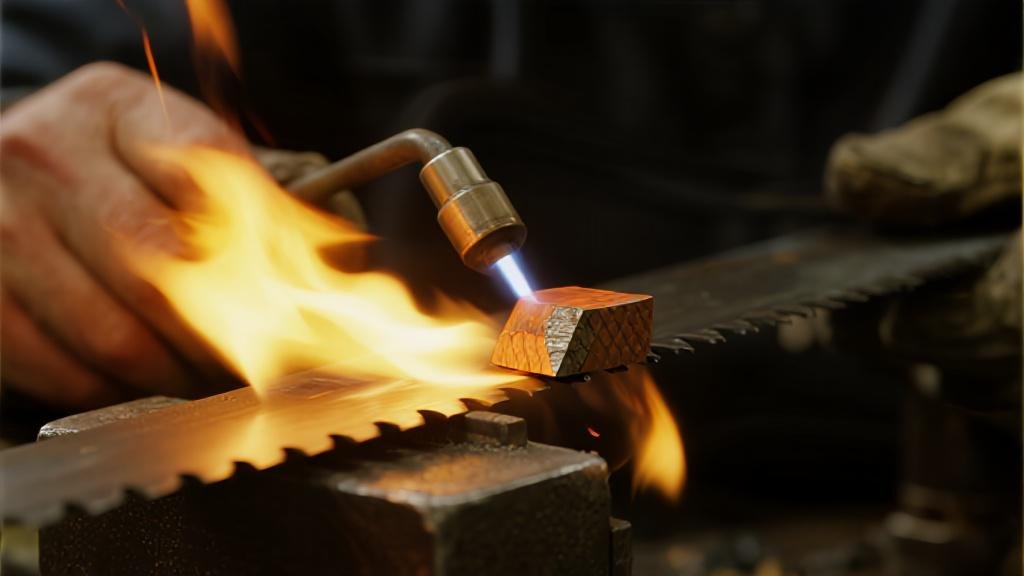
You need a concentrated heat source to melt the brazing alloy without overheating the entire saw plate. An oxy-acetylene torch with a small “00” tip is the traditional choice. However, many modern shops use induction heaters, which use electromagnetic fields to heat only the steel pocket and the carbide tip, providing much better control and safety.
Step-by-Step Instructions on How to Repair Broken Carbide Saw Blade Teeth
Follow these steps meticulously to ensure a bond that is as strong as the original factory braze.
Step 1: Cleaning the Pocket
Remove any remaining carbide or old solder. Heat the pocket until the old solder liquefies and flick the old tip away with a ceramic pick. Once cool, use a small file to clean the steel until it is bright and shiny.
Step 2: Applying Flux
Apply a high-quality brazing flux to both the steel pocket and the new carbide tip. Flux prevents oxidation and allows the solder to “wet” the surfaces properly.
Step 3: Positioning the Tip and Shim
Place the silver brazing shim into the pocket, then place the carbide tip on top. Ensure the tip is centered with a slight overhang on both sides for later grinding.
Step 4: The Brazing Process
Apply heat to the steel plate just behind the pocket. When the flux becomes clear and the silver alloy melts, the carbide tip will “settle.” Use a metal rod to gently press the tip down to squeeze out excess solder.
Step 5: Controlled Cooling
Do not quench the blade in water. Rapid cooling will shatter the carbide. Allow the blade to air-cool slowly to minimize internal stresses.
The Metallurgy of Brazing: Why Temperature Control Matters
The silver brazing alloy creates a metallic bond through capillary action. The ideal temperature is between 1,200°F and 1,350°F. If you under-heat the joint, you get a “cold joint” that will fail instantly. Overheating risks “cooking” the flux and ruining the steel’s temper.
Precision Grinding: Restoring the Cutting Edge Geometry
Once the new tip is securely brazed, it requires shaping. You must use a diamond-impregnated grinding wheel.
- Grinding the Face: Match the hook angle of the other teeth.
- Grinding the Top and Sides: Ensure the new tooth is exactly the same height and width as the others to maintain balance and cut quality.
Economic Analysis: When to Repair vs. When to Replace
The following table provides a comparison to help you decide the best course of action for your damaged blades.
| Blade Type | Typical Condition | Recommended Action |
|---|---|---|
| Budget DIY Blade ($20-$50) | 1-2 Broken Teeth | Replace Blade |
| Professional Blade ($80-$150) | 1-3 Broken Teeth | Repair/Re-tip |
| Industrial/Custom ($200+) | Up to 25% Damage | Professional Re-tip |
| Any Blade Type | Warped or Cracked Plate | Scrap Immediately |
Safety Warning: Operating a blade with missing teeth puts uneven centrifugal stress on the plate, which can lead to catastrophic blade failure. Always repair or replace damaged blades before use.